Tableau Desktop
Tableau Desktop
This page outlines the steps to connect Tableau Desktop to Connect AI.
Note: Before you can configure and use Tableau Desktop with Connect AI, you must first connect a data source to your Connect AI account. See Sources for more information.
There are two ways to establish this connection, each with its own benefits and drawbacks:
-
Using the Tableau Desktop Connector: This method provides the best performance for your reports. However, reports created using this method cannot be published, so they are limited to the local environment. This method is recommended unless you need to publish your reports.
-
Using the Virtual SQL Server API: This method allows you to publish your reports outside the local environment. However, the performance of this method might not meet the same standard as the connector. This method is only recommended if you need to publish your reports.
Follow the steps below for your chosen connection method.
Method 1: Use the Connector
The Tableau Desktop Connector for Connect AI can be used to establish a connection in both the desktop and server editions of Tableau. The connector includes comprehensive high-performance data access, real-time integration, extensive metadata discovery, and robust SQL-92 support.
Step 1: Install the Connector
Follow the directions below for your environment.
Tableau Desktop
Prerequisites
Before you start, you must have a supported Tableau application installed. Supported applications include:
- Tableau Desktop 2020.1 or later
- Tableau Prep 2020.4.1 or later.
For older versions of Tableau Desktop, please use either ODBC or JDBC instead.
Installation Instructions
Once the prerequisites are satisfied, follow these steps to install the connector:
-
Open the Integrations page of Connect AI.
-
In the BI and Reporting Tools section, click Tableau Desktop.
-
Download and run the setup file. If Tableau Desktop is running during installation, you will need to close and reopen it after the installation finishes.
-
Once the installation is complete, click Finish.
If you have Tableau Desktop 2020.3 or later, the setup automatically attempts to register the driver with your Tableau install. By default, the driver .jar file is placed into:
- Windows:
C:\Program Files\Tableau\Drivers - Mac:
/Users/myuser/Library/Tableau/Drivers
By default, the connector .taco file is placed into:
- Windows:
C:\Users\myuser\Documents\My Tableau Repository\Connectors - Mac:
/Users/myuser/Documents/My Tableau Repository/Connectors
Manual Registration
If you are using Tableau Prep or a version of Tableau Desktop earlier than 2020.3, the Connect AI Connector setup will not be able to detect your Tableau install. After completing setup, you will need to register the connector manually by following these steps:
-
Find the connector install directory. By default, this is
C:\Program Files\CData\Tableau Connector for CData Connect 2021for Windows and/Applications/Tableau Connector for CData Connect 2021for MacOS. -
Find your Tableau repository. Your repository is usually located in your documents folder with the name
My Tableau Repository. If you are using Prep, it is calledMy Tableau Prep Repository. -
Open the Tableau install directory and open the
libdirectory. Copycdata.Cloud.legacy.tacointo theConnectorsdirectory within your Tableau repository.
Note: As of Tableau Prep 21.2+, standard taco files are supported instead of legacy taco files.
Tableau Server
Prerequisites
Before you start, you must have a supported Tableau application installed. This includes Tableau Server 2020.1 or later.
For older versions of Tableau Server, please use either the CData ODBC Driver or the JDBC driver for Connect AI instead.
Note: If a connector has the same class as a connector previously registered, the new one will be rejected.
Install Instructions
Once the prerequisites are satisfied, follow these steps to install the connector:
-
Open the Integrations page.
-
In the BI and Reporting Tools section, click Tableau Desktop.
-
Download and run the setup file. If Tableau Server is running during installation, you will need to close and reopen it after the installation finishes.
-
Once the installation is complete, click Finish.
-
A JAR file will be automatically placed in the Drivers directory, which is
C:\Program Files\Tableau\Driversby default. This file needs to remain here for the connector to function properly. -
Make sure that the license file (.lic) is placed alongside the JAR in the
Driversfolder. -
Drop the
.tacofile into[RootDirectory]/data/tabsvc/vizqlserver/Connectors. The root directory is likely to beProgramDataon the drive Tableau Server is installed on. -
Restart the server.
-
To use an unsigned packaged connector, optionally disable signature verification by setting
native_api.disable_verify_connector_plugin_signaturetotruevia TSM.
Step 2: Connecting to Connect AI
Once the connector is installed, open Tableau Desktop or Tableau Server and perform the following steps:
-
In the Connect sidebar menu, under the To a Server category, click More…
-
Use the search field or locate and click CData Connect by CData.
-
A sign-in prompt appears. Click Sign In.
-
Sign in to your Connect AI account.
-
After signing in, or if you are already signed in, your connection appears in the Connections pane on the left.
You can now use the desired Schema in Tableau.
Method 2: Use Virtual SQL Server
As an alternative to downloading and installing the connector, you can connect to the Connect AI Virtual SQL Server API. This method is only recommended if you need to publish your reports.
Prerequisites
Before connecting to Tableau, ensure that the latest Microsoft ODBC Driver for SQL Server is installed on your system. To verify that you have the latest version, open the ODBC Data Source Administrator > Drivers tab.
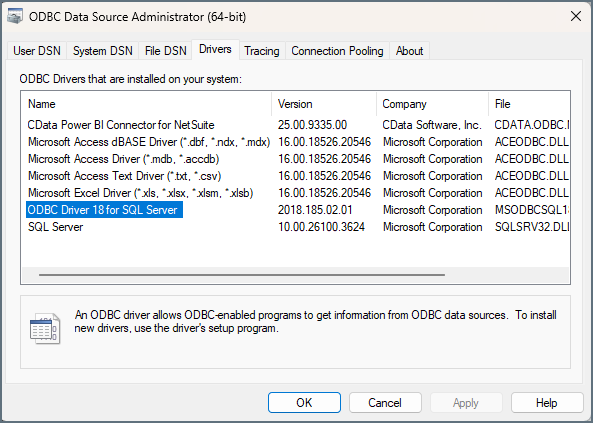
If the driver in use is SQL Server or SQL Server Native Client, upgrade to Microsoft ODBC Driver 18 for SQL Server. Click here to download.
You must also generate a Personal Access Token (PAT) on the Settings page of Connect AI. Copy this down, as it acts as your password during authentication.
Connect to Connect AI
To establish a connection from Tableau Desktop to the Connect AI Virtual SQL Server API, follow these steps.
-
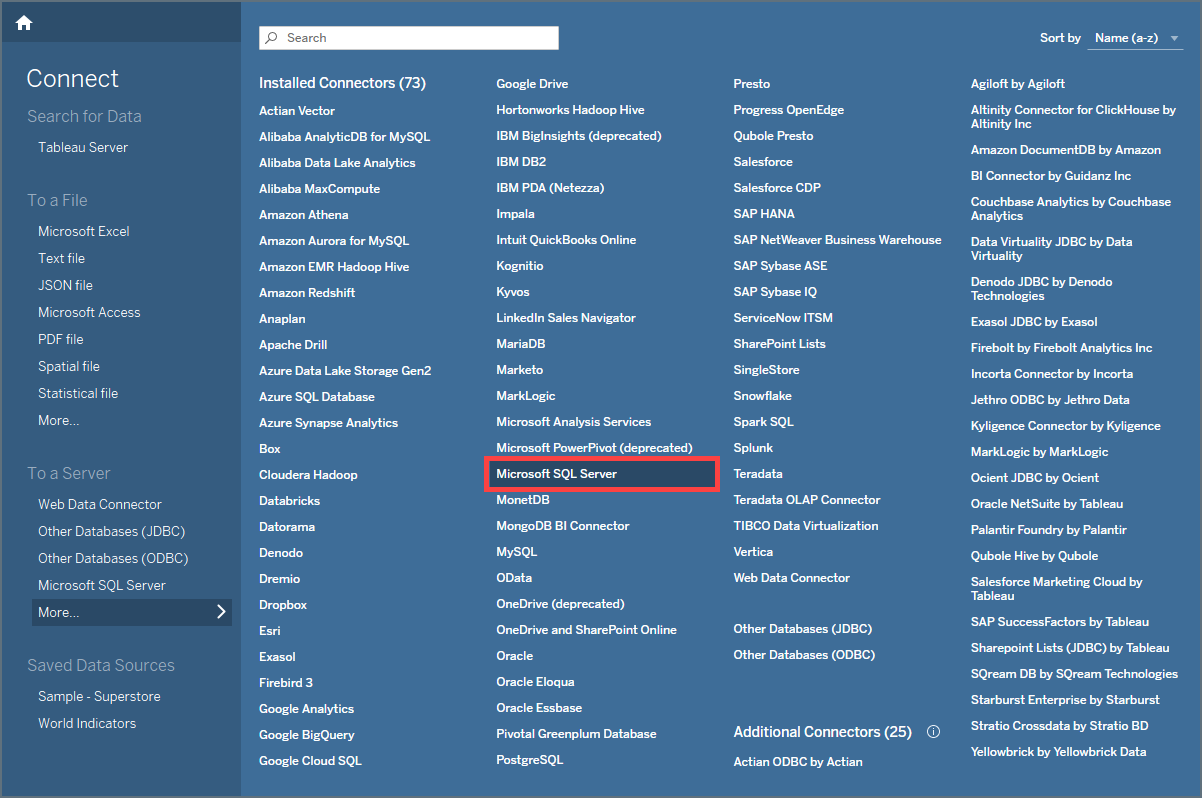
In Tableau Desktop, open a new book. Under To a Server, select More, then Microsoft SQL Server.
-
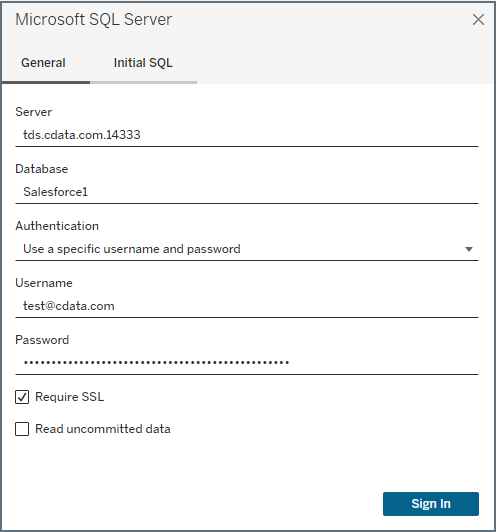
Enter your credentials:
-
Server—enter the Virtual SQL Server endpoint and port separated by a comma: tds.cdata.com,14333
-
Database—enter the Connection Name of the Connect AI data source you want to connect to (for example, Salesforce1).
-
Authentication—select Use a specific username and password.
-
Username—enter your Connect AI username. This is displayed in the top-right corner of the Connect AI interface. For example, test@cdata.com.
-
Password—enter the PAT you generated on the Settings page.
-
Require SSL—leave this selected.
-
-
Click Sign In. The authentication process may take a few minutes.
After you successfully sign in, you can access your data in the Tableau Desktop sidebar to create and publish reports.
Learn More
To learn more information about using the Tableau Connector for Connect AI, click here.