Power BI Desktop
Power BI Desktop
This page outlines the steps to connect Power BI Desktop to Connect AI.
Note: Before you can configure and use Power BI Desktop with Connect AI, you must first connect a data source to your Connect AI account. See Sources for more information.
Step 1: Connect to Connect AI
-
In Power BI Desktop, click Get Data to open the Get Data window. In the drop-down list, click More.
-
Use the search field to find Connect AI and click Connect.
-
Click Sign in on the prompt that appears. Depending on your setup, this button may be labelled Sign in as different user.
-
In the Connect AI dialog, sign in to your Connect AI account.
-
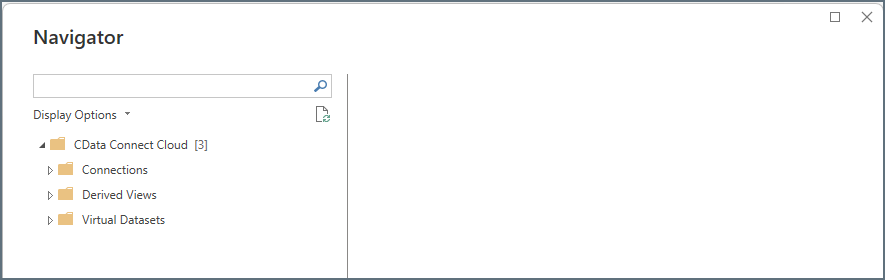
Return to Power BI Desktop and click Connect in the sign-in prompt. The Navigator dialog displays the three types of Connect AI connections: Connections, Derived Views, and Workspaces.
Step 2: Import Data
After you connect to Connect AI, follow these steps to import data to Power BI Desktop:
-
In the Navigator dialog, expand the Connections, Derived Views, or Workspaces folder to locate the data to load.
The data is organized in the Navigator as follows:
- Connections > Schemas > Table/View/Stored Procedure
- Derived Views > Derived View
- Workspaces > Assets > Table/View/Stored Procedure
For example, to load a specific table within a connection, expand Connections, and then expand the connection name. Expand the appropriate schema and then select the table(s) to load, as shown below.

-
Check the boxes next to the any data that you want to work with. You can view a preview of the data if you wish.
- Click Load or Transform Data.
- Load instructs the connector to execute the underlying query to Connect AI.
- Transform Data launches the Query Editor and displays a representative view of the table. To run a custom query through this interface, see Running a Custom Query.
- Create Power BI visuals with the data you loaded.
Running a Custom Query
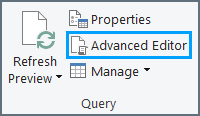
To run a custom query on your data, select Transform Data when you are importing from Connect AI and folllow these steps:
-
In the Power Query Editor window, select Advanced Editor in the Home tab of the navigation ribbon.
-
In the Advanced Editor, enter the text in the following format, replacing the contents of the query with your custom query.
let Source = CDataConnectCloud.Contents([Query="SELECT ACCOUNTNUMBER, BILLINGSTREET, BILLINGCITY, BILLINGSTATE FROM [Snowflake3].[NORTHWIND].[ACCOUNT] LIMIT 100"]) in Source -
Click Done to load your data into Power BI Desktop.