QuickBooks Online
QuickBooks Online
Note: Starting October 31, 2025, Intuit will begin charging for API calls authenticated through partner-issued credentials. We strongly encourage you to create and configure your own OAuth application credentials directly from the Intuit Developer portal and update your connector configuration on this page.
Prerequisites
To create a custom OAuth application in the Intuit Developer Portal (strongly recommended), follow these steps:
-
Log into the Intuit Developer Portal.
-
Go to: https://developer.intuit.com.
-
Sign in with your Intuit account (or create one if you don’t already have one).
-
-
Create a new app.
- From the dashboard, open an existing Workspace or create a new one if you do not yet have one. In the Workspace, click the + button to create a new app.
-
Set up app details.
-
The Type screen should automatically pick QuickBooks Online and Payments.
-
On the Basic info screen, provide a name for your application (for example, CData QuickBooks Integration).
-
On Permissions, select the com.intuit.quickbooks.accounting permission.
-
Click Done and Confirm the creation of your application. Afterwards, Open your application.
-
-
Configure the redirect URI.
-
In the App Overview of your application, go to Settings > Redirect URIs. Click Add URI and add the following redirect URI (used by CData connectors): https://oauth.cdata.com/oauth/.
-
Save the configuration.
-
-
Set the Regulated Industries.
-
Go to Settings > Regulated Industries. Select None of the above, then Save.
-
This will shorten the questionnaire in the next step. Intuit recommends waiting 30 minutes after saving to ensure this takes effect.
-
-
Submit the app assessment for production keys.
-
Intuit requires an assessment to be submitted for every application, even if it is used for internal use in your own company. In the App Overview, navigate to the Compliance tab. Click Start questionnaire.
-
You should only see two tabs: General Questions and App Information. If you see more than two tabs, please wait for Step 5 to take effect.
-
Under General Info, answer all the questions as per your organization’s specifications.
-
Under App Information, select You were asked to create this app in order to get credentials/keys to be used on another platform that integrates with QuickBooks for question 1. Provide the following link: https://www.cdata.com/drivers/qbonline/.
-
Click Submit once you are done and wait to receive the Application Assessment - Questionnaire Completed email.
-
-
Retrieve your credentials.
- Once Intuit has approved your application, copy the Client ID and Client Secret generated for your app from the Keys and Credentials > Production section of the App Overview. You enter these values in the setup steps below.
セットアップガイド
以下の手順で、QuickBooks Online をConnect AI アカウントに接続します。
-
Connect AI のダッシュボードからConnections ページを開きます。
-
右上の+ Add Connection をクリックします。
-
検索フィールドに QuickBooks Online と入力し、データソース名をクリックします。
-
新しいコネクションのBasic Settings タブで、コネクション名を入力するかデフォルトの名前をそのまま使用します。
-
Set Use Sandbox to True only if you are using a sandbox account. Otherwise, leave it as False.
-
Select the Country Code that best matches your location.
-
If you are using a custom OAuth application (strongly recommended), click Advanced Settings and enter the Client Id and Client Secret obtained from the prerequisites.
-
If you are using embedded credentials, click Sign in to connect using those credentials. This action opens the QuickBooks Online sign-in page in a new tab.
-
Connect AI Add QuickBooks Online Connection ページ上部の、Save & Test をクリックします。
-
接続テストに成功すると、コネクションが作成されたことを示すConnection successfully saved というメッセージが表示されます。Edit Connection ページのStatus もAuthenticated に変わります。Edit Connection ページの右ペインにあるData Model タブで、成功したコネクションのデータモデルを表示します。
-
接続テストに失敗した場合は、入力したログイン情報に余分なスペースや文字がないかを確認してください。Connect AI は、データが不足している必須フィールドの下にエラーメッセージを表示します。一部のデータソースでは、ソースのWeb サイトに直接サインインする必要があります。サインインしていない場合は、Sign in ボタンの下にエラーメッセージが表示されます。エラーを修正し、もう一度試してください。
-
失敗したコネクションは下書きとして保存され、Status はNot Authenticated になります。後でコネクションに戻って認証することができます。
-
Common Queries
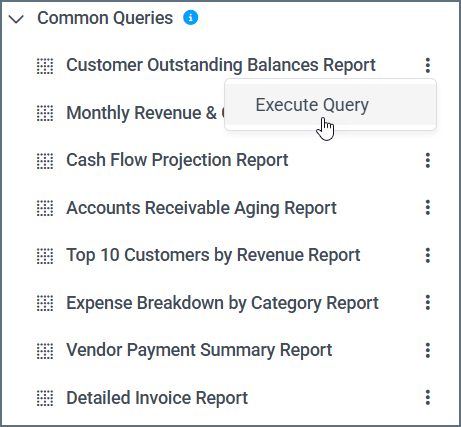
The Data Model tab, in addition to the QuickBooks Online data model, contains a list of common queries used for QuickBooks Online. Expand Common Queries to view the SQL query templates, such as Customer Outstanding Balances Report. Click the ellipsis next to the query title and click Execute Query.
The Data Explorer screen appears, displaying the SQL query. From there, you can execute, edit, or save the query. You can also save the query as a derived view, so that you can access it from external integrations.
詳細について
Connect AI とQuickBooks Online の連携の詳細動作については、こちらのページを参照してください。