Sage Intacct
Sage Intacct
Prerequisites
Before you attempt to connect to Sage Intacct, make sure to add the Sender ID ‘CData’ into your list of authorized Sender IDs for Web Services authorizations.
To add the Sender ID, follow these steps:
-
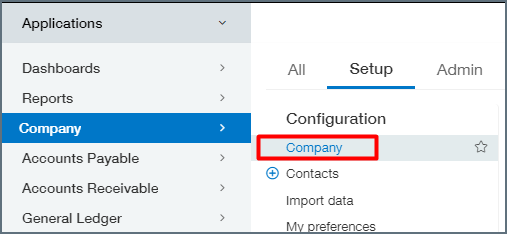
Log in to Sage Intacct as an administrator.
-
Navigate to Company.
-
Under Setup select Company.
-
Go to the Security section and add the CData Sender ID.

-
If this does not work, utilize our Sender ID and Sender Password to select another user with the right permissions from your Web Services authorizations list.
If necessary, contact support@cdata.com for additional assistance.
セットアップガイド
以下の手順で、Sage Intacct をConnect AI アカウントに接続します。
-
Connect AI のダッシュボードからConnections ページを開きます。
-
右上の+ Add Connection をクリックします。
-
検索フィールドに Sage Intacct と入力し、データソース名をクリックします。
-
新しいコネクションのBasic Settings タブで、コネクション名を入力するかデフォルトの名前をそのまま使用します。
-
Enter your Company Id into the Company ID field. You can find this Id in Sage Intacct under Company > Company info.
-
Select the Authentication method, then proceed to the relevant section and follow those instructions.
Authentication Methods
BasicReadOnly
-
First make sure that you have not specified either a “SenderID” or “SenderPassword” in Sage Intacct.
-
In the Sage Intacct Web Services dashboard, navigate to Company > Company Info > Security.
-
Add CData to the Web Services authorizations by navigating to Security > Web Services Authorizations/ Edit. Remember that this is case sensitive.
-
On the Connect AI connections page, add the embedded User and Password provided by Sage Intacct.
-
Connect AI Add Sage Intacct Connection ページ上部の、Save & Test をクリックします。
-
接続テストに成功すると、コネクションが作成されたことを示すConnection successfully saved というメッセージが表示されます。Edit Connection ページのStatus もAuthenticated に変わります。Edit Connection ページの右ペインにあるData Model タブで、成功したコネクションのデータモデルを表示します。
-
接続テストに失敗した場合は、入力したログイン情報に余分なスペースや文字がないかを確認してください。Connect AI は、データが不足している必須フィールドの下にエラーメッセージを表示します。一部のデータソースでは、ソースのWeb サイトに直接サインインする必要があります。サインインしていない場合は、Sign in ボタンの下にエラーメッセージが表示されます。エラーを修正し、もう一度試してください。
-
失敗したコネクションは下書きとして保存され、Status はNot Authenticated になります。後でコネクションに戻って認証することができます。
-
Basic
-
Enter the following information:
-
User—認証用のSage Intacct ユーザー名.
-
Password—ユーザーパスワード.
-
Sender ID—The Web Services Sender Id assigned by Sage Intacct. Contact your Sage Intacct representative for more details.
-
Sender Password— Your registered Web Services password. Contact your Sage Intacct representative for more details.
-
-
Connect AI Add Sage Intacct Connection ページ上部の、Save & Test をクリックします。
-
接続テストに成功すると、コネクションが作成されたことを示すConnection successfully saved というメッセージが表示されます。Edit Connection ページのStatus もAuthenticated に変わります。Edit Connection ページの右ペインにあるData Model タブで、成功したコネクションのデータモデルを表示します。
-
接続テストに失敗した場合は、入力したログイン情報に余分なスペースや文字がないかを確認してください。Connect AI は、データが不足している必須フィールドの下にエラーメッセージを表示します。一部のデータソースでは、ソースのWeb サイトに直接サインインする必要があります。サインインしていない場合は、Sign in ボタンの下にエラーメッセージが表示されます。エラーを修正し、もう一度試してください。
-
失敗したコネクションは下書きとして保存され、Status はNot Authenticated になります。後でコネクションに戻って認証することができます。
-
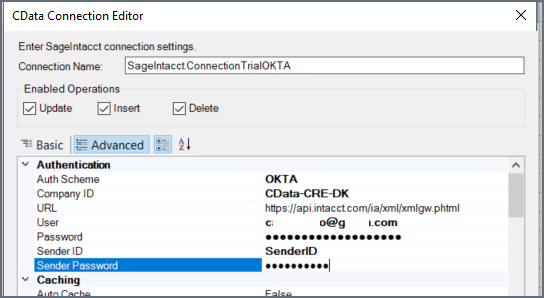
OKTA
-
Enter the following information:
-
User—The Okta user account.
-
Password—The password associated with the Okta account.
-
SSO Login URL—Set to the URL used by the SSO provider.
-
SSO Properties—Add property IntacctUserID, set to the Okta user specified in the User connection property. Then add all desired properties. The following is an example of a valid connection string: AuthScheme=Okta; SSOLoginURL=’https://example.okta.com/home/appType/0bg4ivz6cJRZgCz5d6/46’; User=oktaUserName; Password=oktaPassword; SSOProperties=’IntacctUserID=intacct_user’; .
-
Note: If you add an APIToken property, it must be set to the API Token that the customer created from the Okta org. It should only be used when authenticating a user via a trusted application or proxy that overrides Okta client request context.
-
-
Connect AI Add Sage Intacct Connection ページ上部の、Save & Test をクリックします。
-
接続テストに成功すると、コネクションが作成されたことを示すConnection successfully saved というメッセージが表示されます。Edit Connection ページのStatus もAuthenticated に変わります。Edit Connection ページの右ペインにあるData Model タブで、成功したコネクションのデータモデルを表示します。
-
接続テストに失敗した場合は、入力したログイン情報に余分なスペースや文字がないかを確認してください。Connect AI は、データが不足している必須フィールドの下にエラーメッセージを表示します。一部のデータソースでは、ソースのWeb サイトに直接サインインする必要があります。サインインしていない場合は、Sign in ボタンの下にエラーメッセージが表示されます。エラーを修正し、もう一度試してください。
-
失敗したコネクションは下書きとして保存され、Status はNot Authenticated になります。後でコネクションに戻って認証することができます。
-
詳細について
Connect AI とSage Intacct の連携の詳細動作については、こちらのページを参照してください。